


Introduction
Imagine you are working on a search feature where a user types in a keyword and a matched query is returned, but you are not sure how the keyword is going to be typed. Is it going to be Capitalized? lowercases? ALL CAPS...etc? Also, you don't care how the data is stored in your database, whether it is "Cat" or "cat", you want both to be queried.
There are two approaches supported by MongoDB that allows us to do case-insensitive queries
$regexqueries- Non-
$regexqueries which requires a case-insensitive index
In this tutorial we will mainly tackle $regex queries. This is a relatively easier approach, however, it could be less performant in some cases. The other approach will be covered in another tutorial.
At the end of this tutorial, you should be able to do the following:
- Run a case-insensitive query using
$regexon a single string value e.g. "Cat", "dog", "raBBit"...etc- Run a case-insensitive query using
$regexon an array of string values e.g. ["Dancing","cooking","SinGinG"]
Prerequisites
To complete this tutorial, you should be familiar with Node.js, Express.js, MongoDB, and Mongoose. In addition to having a development environment for Node.js setup. Also, a tool for testing API endpoints like Insomnia.
Step 1 - Setting up the project
Let's start with setting up a server for our tutorial. Here, we will pretend that we are building HumansGotTalent portal. We want to create API endpoints to add and search for humans based on their talents.
First, run the following command to setup a new project
npm init -y
Then, install the required dependencies
npm install body-parser express mongoose morgan
Create a new file named index.js in your project to setup the Express application
echo "" >> index.js
Now, we can move to the initialization of our application.
//Loading dependencies
const express = require('express');
const bp = require('body-parser'); //parse request bodies
const mongoose = require('mongoose'); //MongoDB ORM
const morgan = require('morgan'); //for logging
// ...

const app = express();
const port = process.env.NODE_ENV || 3000;

//Load application middlewares
app.use(bp.json());
app.use(bp.urlencoded({ extended: true }))
app.use(morgan('dev'));

app.listen(port, () => {
    console.log(`Server running correctly on port ${port}`)
})
Handling the endpoints
Create a file where we will put our routes and handlers in
echo "" >> human.router.js
Inside the human.router.js, create the following routes
const express = require('express');
const router = express.Router();

router.post('/humans', async (req, res, next) => {
//We will implement it later
    try {
        const query = req.body;
        res.status(200).json({ query, message:"Hello World" })
        next()
    } catch (e) {
        next(e)
    }
})
module.exports = router;
When a POST request hits this endpoint /humans, the application will process the request and send a response.
Now require the routes in index.js and load them in our app
// ...
const routes = require('./human.router');
const app = express();
const port = process.env.NODE_ENV || 3000;

// ...

app.use('/',routes); //Loading our routes
app.listen(port, () => {
    console.log(`Server running correctly on port ${port}`)
})
Now open package.json and add the following start script to scripts section, which allow us to run our application in the terminal. It should look like this.
// ....
"scripts": {
    // ...
    "start": "node index.js"
  },
// ....
Finally, run our app in the terminal using the following command
npm run start
You should see the following output in the terminal Server running correctly on port 3000
Testing the endpoint
You can use a tool like Insomnia in testing the endpoint following these steps
- Press the
+symbol and pressNew Request - Set a name for the request and choose its type to be POST
- Press on
No bodyand chooseJSONfrom the dropdown list - Fill the request URL with the server location (In most cases, it is
http://localhost:3000) and add anynameat the end. for examplehttp://localhost:3000/John - Enter the data and press
Send, and observe the response and terminal's output
For example, consider this the request:
{
    "Talents": [
        "Singing",
        "Acting",
        "Cooking"
    ]
}
Expected output in the terminal:
{
    "query": {
        "Talents": [
            "Singing",
            "Acting",
            "Cooking"
        ]
    },
    "message": "Hello World"
}
Setup MongoDB and Mongoose
Mongoose is the one of the most preferred wrappers for MongoDB in Node.js, since it allows us to interact with our MongoDB database easily. We can start connecting our server in index.js file.
//...
mongoose
    .connect("mongodb://localhost:27017/casein", { useNewUrlParser: true })
    .then(() => {
        console.log("Connected to Database")
    })
    .catch(()=>
    {
        console.log("Can't connect to this port, please use another port")
    })
//....
Here we used mongoose which we imported previously to connect to a database called casein. You can change the name to whatever you want and if you don't have a database with this name, mongoose will handle it for you. Also, you can change the port number 27017 to whatever you want in case it couldn't connect.
The index.js file should look like this right now
const express = require('express');
const bp = require('body-parser');
const mongoose = require('mongoose');
const morgan = require('morgan');
const routes = require('./human.router');

const port = process.env.NODE_ENV || 3000;

const app = express();
app.use(bp.json());
app.use(bp.urlencoded({ extended: true }))
app.use(morgan('dev'));

app.use('/', routes);

mongoose
    .connect("mongodb://localhost:27017/casein", { useNewUrlParser: true })
    .then(() => {
        console.log("Connected to Database")
    })
    .catch(()=>
    {
        console.log("Can't connect to this port, please use another port")
    })

app.listen(port, () => {
    console.log(`Server running correctly on port ${port}`)
})
Mongoose model
Now create another file in our project's directory called human.model.js in order to define a schema for our documents inside the database.
echo "" >> human.model.js
Then, create a model that will allow us to interact with collections in the database.
const mongoose = require('mongoose');

const humanSchema = new mongoose.Schema({
    name:{
        type: String
    },
    talents:{
        type:[String]
    }
});

const Human = mongoose.model('human', humanSchema);
module.exports = Human;
Now inside human.router.js, we will implement endpoints request handlers for retrieving all Human documents and for creating a Human document.
const express = require('express');
const Human = require('./human.model');

const router = express.Router();

router.post('/humans', async (req, res, next) => {
    try {
        const doc = await Human.create({...req.body});
        res.status(201).json({doc})
    } catch (e) {
        console.log(e)
        res.status(500).end()
    }
})
router.get('/', async(req,res,next)=>{
    try {
        const doc = await Human.find({});
        res.status(200).json({doc})
    } catch (e) {
        console.log(e)
        res.status(500).end()
    }
})
router.get('/humans', async(req,res,next)=>{
//For searching. We will implement it in Step 2
})
module.exports = router;
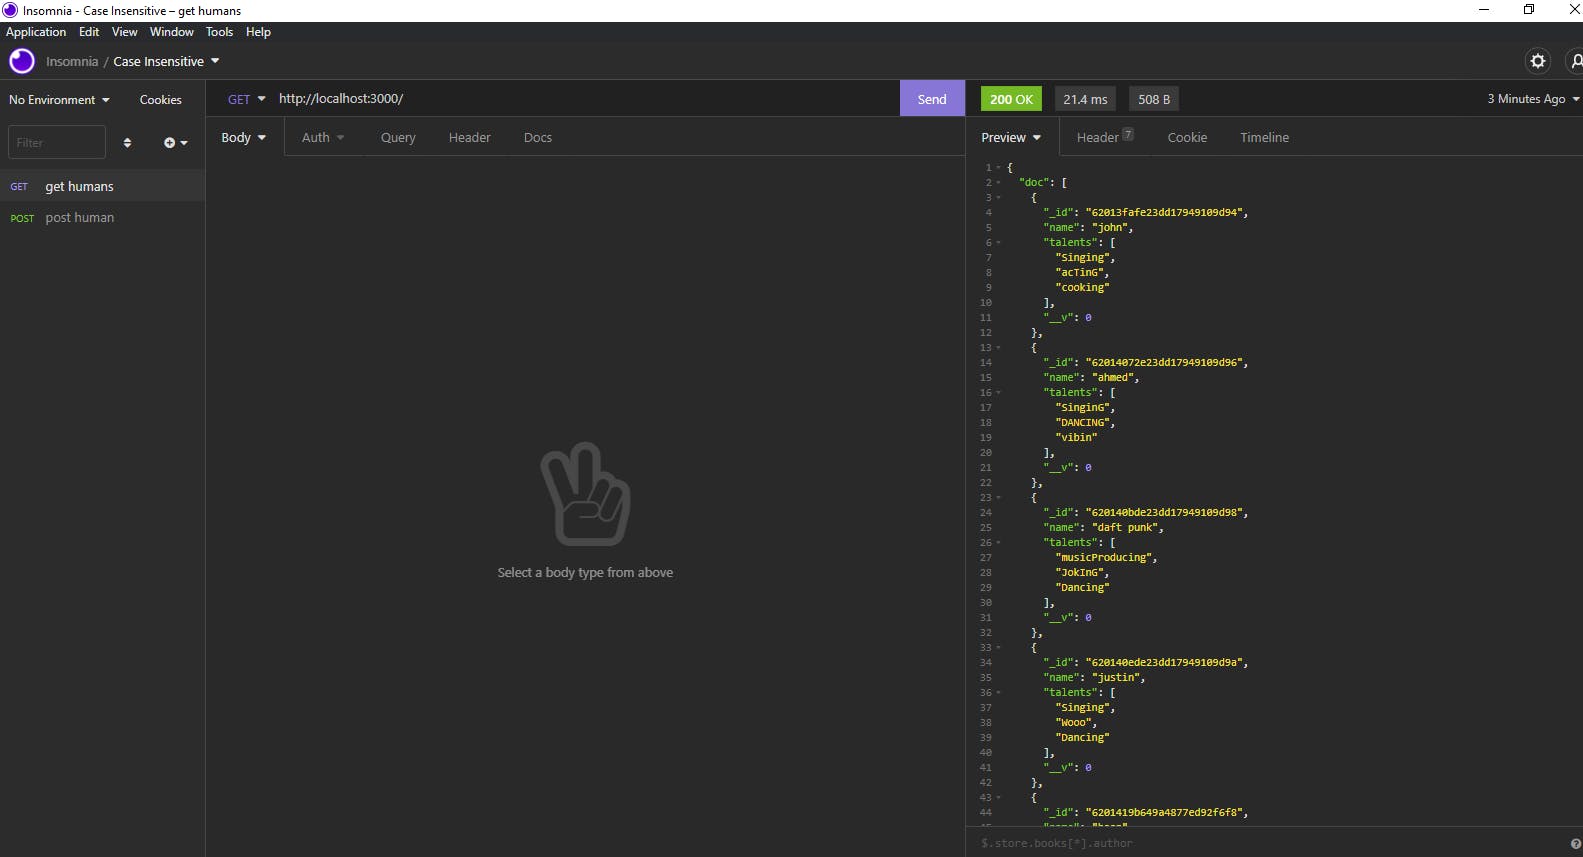
Then inside Insomnia, do several POST requests on the endpoint http://localhost:3000/humans to add several Human documents in the database, and do a GET request on the endpoint http://localhost:3000 to retrieve all the Human documents saved.
For example, this is one of the POST requests and its response
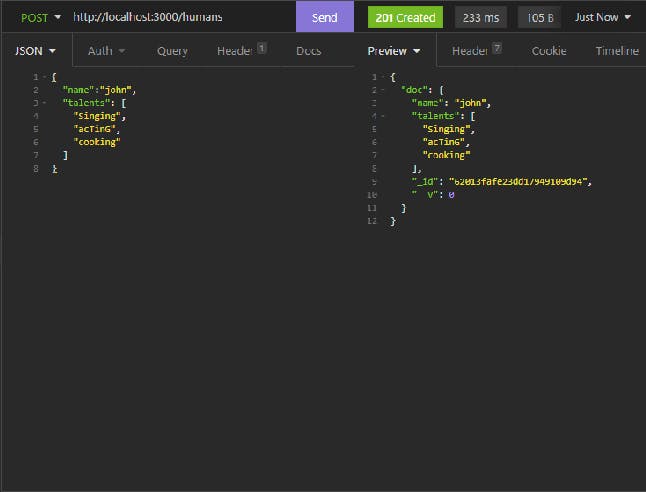
These are the data that we added using several POST requests
{
            "name": "john",
            "talents": [
                "Singing",
                "acTinG",
                "cooking"
            ],
        },
        {
            "name": "ahmed",
            "talents": [
                "SinginG",
                "DANCING",
                "vibin"
            ],
        },
        {
            "name": "daft punk",
            "talents": [
                "musicProducing",
                "JokInG",
                "Dancing"
            ],
        },
        {
            "name": "justin",
            "talents": [
                "Singing",
                "Wooo",
                "Dancing"
            ],
        },
        {
            "name": "boon",
            "talents": [
                "driving",
                "Wooo",
                "coding"
            ],
        },
        {
            "_id": "620143d2649a4877ed92f6fb",
            "name": "arnold",
            "talents": [
                "driving",
                "Wooo",
                "singing"
            ],
            "__v": 0
        }
The following screenshot is the GET request and response:
Now we are ready to implement our search feature.
Step 2 - Case Insensitive - single keyword
As we saw above for the data stored in our database, they were not following a specific case. For example, singing were written several times, each time different from the other. For instance: singing Singing SinginG.
Actually, it is relatively easy to search by a single keyword. Lets move to human.router.js file so we can start implementing router.get('/humans')
//....
router.get('/humans', async (req, res, next) => {
    const talentPattern = req.query.talents //extracting talent from the query portion of the URL
    try {
        const doc = await Human.find({
            talents:
                { $regex: `^${talentPattern}`, $options: 'i' } //finding talent that match this regex (talentParam)
        });
        res.status(200).json({ doc });
    } catch (e) {
        console.log(e)
        res.status(500).end()
    }
})
//....
Here we are querying for documents that matches a specific regex. In order to use $regex, we must provide it a pattern and options as mentioned in MongoDB's documentation
To use $regex, use one of the following syntaxes:
{ <field>: { $regex: /pattern/, $options: '<options>' } }
{ <field>: { $regex: 'pattern', $options: '<options>' } }
{ <field>: { $regex: /pattern/<options> } }
So, we provided our pattern ^${talentPattern} to $regex operator. ^ indicates that we should start with the following characters of talentPattern, and also added i flag inside options field which indicates case insensitivity.
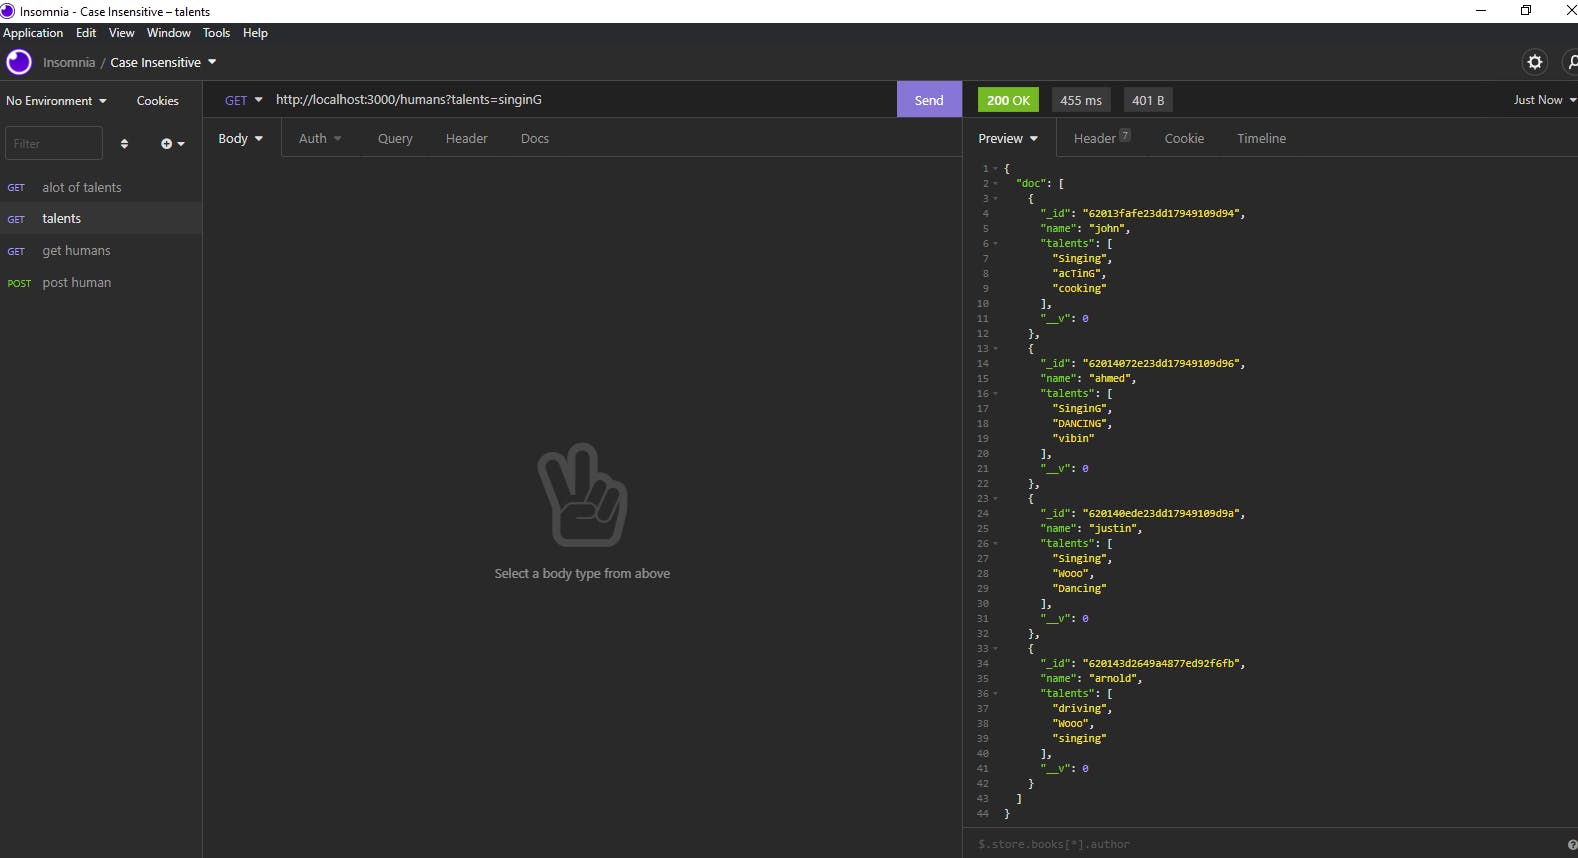
For example, we made a POST request fon http://localhost:3000/singinG. Now, talentPattern contains singinG where we will be able to perform case-insensitive match for documents with talents field that starts with singing value.
{
    "doc": [
        {
            "_id": "62013fafe23dd17949109d94",
            "name": "john",
            "talents": [
                "Singing",
                "acTinG",
                "cooking"
            ],
            "__v": 0
        },
        {
            "_id": "62014072e23dd17949109d96",
            "name": "ahmed",
            "talents": [
                "SinginG",
                "DANCING",
                "vibin"
            ],
            "__v": 0
        },
        {
            "_id": "620140ede23dd17949109d9a",
            "name": "justin",
            "talents": [
                "Singing",
                "Wooo",
                "Dancing"
            ],
            "__v": 0
        },
        {
            "_id": "620143d2649a4877ed92f6fb",
            "name": "arnold",
            "talents": [
                "driving",
                "Wooo",
                "singing"
            ],
            "__v": 0
        }
    ]
}
As we can see in the screenshot above, the response contained all Human documents that have singing in talents, ignoring case-sensitivity.
Case-Insensitive - Several Keywords
Now consider that we want to search for Human documents that have several talents like singing and dancing.
In human.router.js we can create another endpoint /alotoftalents/humans where we will be able to implement searching for several keywords
//...
router.get('/alotoftalents/humans', async(req,res,next)=>{
    try {
        const talentsList = req.query.talents; //extracting list of talents from the query portion of the URL
        var inTalentsList = [] //holding RegExp objects of case-insensitive talents list
        talentsList.forEach(talent =>{
            var inTalent = RegExp(`^${talent}`,'i') //RegExp object contains talent pattern and case-insensitive option
            inTalentsList.push(inTalent)
        });

        const doc = await Human.find({
            talents: { $all: inTalentsList}
        })
        res.status(200).json({data:doc})
    } catch (e) {
        console.log(e)
        res.status(500).end()
    }
})
//...
Here we extracted a list of talents from request query in talentsList and declared an empty inTalentsList where it will hold values of RegExp objects that have a pattern of each talent and case-insensitive flag i. We were able to fill inTalentsList in the iteration by pushing inTalent which is the RegExp object.
Then, we performed a query using $all operator which retrieves all documents containing the subset of values that we pass, and the subset might be in any order as well.
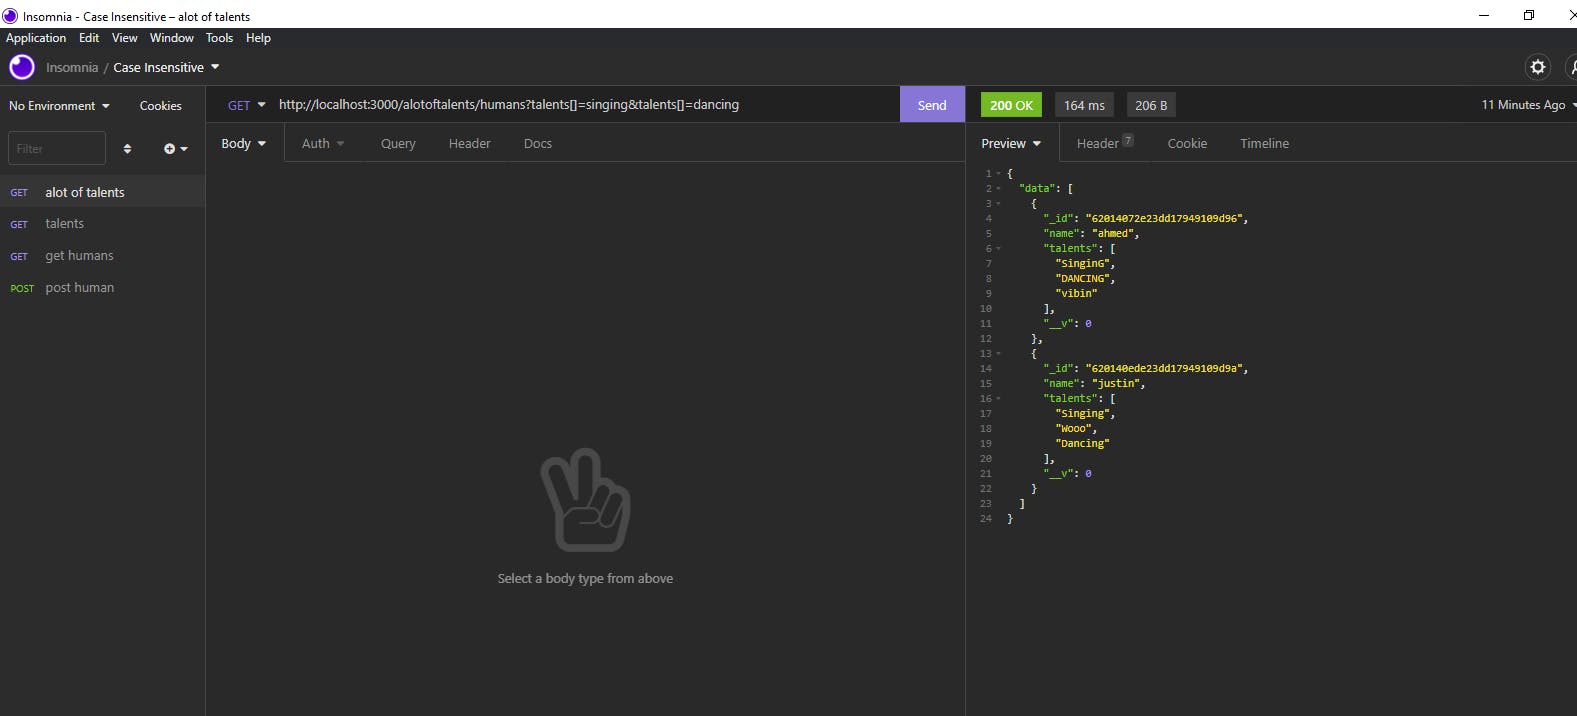
Now lets test our endpoint using the following query http://localhost:3000/alotoftalents/humans?talents[]=singing&talents[]=dancing
{
    "data": [
        {
            "_id": "62014072e23dd17949109d96",
            "name": "ahmed",
            "talents": [
                "SinginG",
                "DANCING",
                "vibin"
            ],
            "__v": 0
        },
        {
            "_id": "620140ede23dd17949109d9a",
            "name": "justin",
            "talents": [
                "Singing",
                "Wooo",
                "Dancing"
            ],
            "__v": 0
        }
    ]
}
We find that it returns all documents that have both singing and dancing in talents field regarding their cases.
Conclusion
In this tutorial, we have created an endpoint in order to search for a keyword using $regex and another endpoint to search for various keywords. Although, $regex queries are easy approaches, if you are looking for robust performance, it is suggested to resort to the other approach that we will cover in the next tutorial.
For a complete code sample of this tutorial, check out the CaseInsensitive repository on GitHub.